Recently in Photography

  Page 359 of 385 in Photography  

photoflex_reflector.jpg

My friend Ben Long and I decided to take on an impossible self-assignment the other day: Could we take a decent portrait out in the bright Spring sunshine? I grabbed my camera and the Photoflex 5-in-1 MultiDisc 32"Reflector, then picked up a friend along the way who agreed to be our subject.

The Photoflex kit, which sells for about $100, includes a translucent main disc that we call "the portable cloud," and a slip-on, reversible cover that has four different reflective surfaces. I also carry a second 22-inch disc to use as fill light when I'm using the larger disc as the portable cloud. I also highly recommend the LiteDisc Holder that makes it easier to position the disc or mount it to a light stand.

joanna_reflector.jpg

We had lots of fun using the different combinations out in the bright sun. The Photoflex reflectors and Mother Nature's illumination allows me to create a photo studio just about anywhere -- I just have to make sure I have a second set of hands to hold the disc.

With this image, we used the translucent disc above to soften the harsh midday sun, then added a fill reflector to illuminate the face. I recorded the image with a Canon 5D at 300mm wide open at f-5.6.

One other benefit of the Photodisc is that it helps offset the green cast from the intensely vibrant grass lawn. And if you don't feel like springing the 100 bucks for the kit, you can use the windshield reflector for your car in a pinch.

Technorati Tags: ,

sigma_dp1.jpg

The Sigma DP1 looks like a stylish compact, but inside it uses the same 14 megapixel FOVEON X3 direct image sensor (2652×1768×3 layers) contained in the Sigma SD14 digital SLR. Coupled with a 16.6mm F4 lens for a wide angle field of view equivalent to 28mm on a 35mm film camera, and RAW mode, the DP1 packs a lot of capture quality in a small package.

It's been interesting to watch this camera evolve, even though it still hasn't been released (we're guessing May of this year). The above picture is the prototype that Sigma displayed last September. The look of the camera has changed quite a bit since then with the addition of a hot shoe, mode dial on top, and more classic rangefinder styling. Here's what Sigma was showing off at PMA.

sigma_dp1_rev.jpg

I think the DP1 will be of particular interest to serious photographers committed to another DSLR system such as Canon or Nikon, but who want to work with the FOVEON three layer sensor. The DP1 should be perfect for landscape, street shooting, and working in crowded interiors. I suspect noise levels will be low at high ISOs, plus you have RAW for even more control in post production.

You can learn more about the camera by watching Dave Etchells of Imaging Resource talk to Tom Sobey of Sigma about the DP1 Rangefinder. The YouTube video packs lots of information into just a couple minutes. (BTW: I met Dave on the Panasonic Sunrise Shoot; he's a terrific guy.)

No price has been set yet for the Sigma DP1, but I'm guessing that it will run around $799 US. We'll know for sure when it's released later this spring.

Top photo represents the first prototype that Sigma released in Sept. 2006. The middle photo is what Sigma was showing at PMA. The DP1 has changed considerably since its initial press release.

Technorati Tags: ,

las_vegas_baloon.jpg

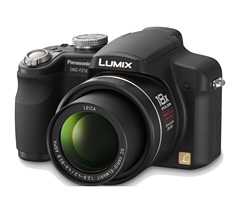
The Panasonic DMC-FZ8 is a compact digital camera that features a 7.2 MP sensor, 12X Leica DC lens, image stabilization, 16:9 option, movie mode, and yes, Raw. The camera, due to ship anytime now, also includes a nice lens hood and filter adapter.

I spent Friday morning shooting with DMC-FZ8 in the Red Rock wilderness area playing with the 36-432mm lens in Jpeg, Raw, and Movie mode. This shot of the balloon rising over the Las Vegas strip was captured in Jpeg mode, ISO 100, 1/500 @ f-7.1, 16:9, focal length at 55mm (330mm equivalent), image stabilization on, pattern meter mode resulting in a 3072x1728 image. Picture quality -- thanks to the lens and processor -- was excellent at ISO 100 and 200, good at 400, and acceptable at ISO 800.

The movie mode was also excellent, capturing directly in QuickTime format with stereo sound. I really like shooting in 16:9 format for the movies, giving me a cinematic 848x480 viewing frame.

Raw mode also worked well and is a welcome addition to this feature-rich camera. I had to use the latest version of Photoshop CS3 or the software included with the FZ8 to decode the files. But I imagine we'll see this capability added to Adobe Lightroom and other decoders before long.

panasonic_fz8_sm.jpg

Overall, this is a very impressive camera that will sell for $349 or less. You have lots of pro features, such as manual exposure, aperture priority, manual focus mode, spot metering, 12X optics, Raw capture, filter adapter, and more. Performance was snappy and responsive. The right handle grip makes it easy to steady the camera while shooting, yet is is compact enough to slip into your jacket pocket or day pack.

If you're looking for a high quality compact camera with Raw and a long zoom, the Panasonic FZ8 should be on your list.

Technorati Tags: , ,

paper_flash_diffuser.jpg

I saw tons of cool equipment at Wednesday's PMA Sneak Peek event, but my favorite was a sheet of letter-size paper folded and attached to a flash with a rubber band to create a very effective diffuser.

I noticed that Steve Makris, a technology writer for the Edmonton Journal, using the device pictured above. I thought is was so simple, yet elegant and quite useful. If you look closely, he's actually using a PMA memo.

And the best thing about it... "I get a fresh one every day," says Steve.

All the more reason to make sure you have a handful of rubber bands in your camera bag.

Technorati Tags: ,

Las Vegas Here I Come - PMA 07

pma_07.jpg

I'm off to Las Vegas to cover this year's PMA show. If you've been following the industry news, you know that already lots of pre-show announcements have been released, such as the Nikon D40x. But there will be more, and I will be there in person to figure it out and relay the information to you.

I have meetings set up with Adobe, Nikon, HP, Pentax, Panasonic, and more. I'll do my best to get you the inside scoop, and hopefully an interview for our weekly podcasts. And if there's anything interesting on the show floor, I'll send along a snapshot or two.

Next stop... Vegas!

Technorati Tags: ,


Sponsor Note...

Add Magic to Your Slideshows -- FotoMagico presentations are so amazing that your audience will be asking how you did it.

dvd_cover.jpg

If you create slideshows with your photos and burn them to DVD for playback in set-top players, you might want to enhance your packaging with a nice album cover and liner notes.

You can make these easily using iTunes. Just create a new playlist, add a QuickTime version of your slideshow to the playlist, then enter the title and author data by using the Get Info (File > Get Info). Now all you have to do is select the playlist and choose Print (File > Print). You have a handful of themes to choose from, pick the one you like, click Print, and out of your printer pops a beautiful DVD insert. It's that easy.

Technorati Tags: ,

color_profiles.jpg

Apple's Preview application is a terrific all-purpose imaging program that comes loaded free on every Mac. It's perfect for reading PDFs, but I've talked before about its many photographer-friendly features, such as in The Simplest of All Raw Converters.

I have more of these tricks up my sleeve, and one that I want to show you today is how to use this application as a quick previewer of how an image will print on various ink/paper stock combinations.

All you have to do is drag your photo onto Preview to open it, go to Tools > Assign Profile, and pick the printer/paper combination you want to preview (obviously you will have to have ICC profiles loaded on your Mac). You can toggle back and forth between the original shot and the adjusted profile shot using the CMD-Z / SHIFT CMD-Z keystroke combinations.

Keep in mind that your monitor has to be calibrated in order for this exercise to be valuable. But it's a great way to take a quick look at how an image should print (more or less) with a certain printer and paper, even if you're not hooked up to that printer at the time.

Technorati Tags: ,

Lightroom Adventure Slideshow

iceland_wedding.jpg

To help celebrate the 1.0 release of Adobe Photoshop Lightroom, the Lightroom Adventure Team has released a beautiful 800x600 slideshow with soundtrack. The 4:40 presentation includes photos from a variety of Adventure photographers, complete with piano music by Kevin MacLeod. This presentation is a healthy 16 MBs, so you might have to wait a minute or two for the download to complete. (I initially had "fast start" enabled, but it broke when I added the ID3 tags.)

Speaking of preparing the movie, it was actually a bit of a challenge for Mikkel Aaland and me to create using Lightroom. The problem was that you can only export slideshows to PDF out of Lightroom, so we had to overcome that in order to create this presentation. Mikkel has just blogged an interesting write up about how we accomplished this in his post titled, A Lightroom QuickTime Slideshow. Yes, QuickTime!. If you're using Lightroom, you might want to take a peek at what he has to say.

You can download the Lightroom Adventure Slideshow here.

Technorati Tags: , ,


Sponsor Note...

ExpoDisc Custom White Balance -- Simply Better Color. Simply Better Pictures. Visit www.expodisc.com

iview_mediapro.jpg

The latest version of iView Media Pro continues Mac support (Universal Binary even) and adds Vista compatibility. Features and fixes include updated Nikon libraries for compatibility with Nikon D80/D40 camera files, corrected issues with some .XMP sidecars not being recognized (Win), and fixed a problem where preferences might not be displayed correctly (Mac). You can read the version history (PDF) for more details.

I think Microsoft is doing a good job of moving the application forward for both Mac and Windows users. If you're looking for a solid Digital Asset Manager (DAM) for photos and other media, this application is definitely worth investigating. You can download a 21-day trial if you want to take a peek.

Technorati Tags: ,

I Messed Up, and Raw + Aperture Saved Me

camera_raw_plugin.jpg

I was driving by the Sebastopol Lagoon the other morning right after the rain had stopped. I've always had a soft spot for how the big puffy clouds reflect in the still pools of the Lagoon, accented by stately trees and a variety of vibrant green plant life.

I found a good vista point and captured about 30 frames. I was thinking that one of these might make a nice 13 x 19 inch enlargement. Unfortunately, I made a bonehead mistake by shooting the series with the white balance set on “custom” from the night before. Fortunately, I record in Raw, so I was able to correct the blunder quickly during post production in Aperture.

I began my path to redemption by selecting the “Daylight” white balance preset that I had created previously in the Adjustments HUD, then applied it to the first image in the series. With the photo still selected, I used Shift-CMD-C to copy my adjustment. Then I selected the other images in the series and used Shift-CMD-V to add the Daylight white balance setting to them.

Within just minutes, I had corrected an otherwise disasterous mistake that would have ruined my day back in the “Jpeg/destructive editing” dark years. Now I'm off to the printer to see how these shots look on paper.

PS: You can learn more about Aperture by checking out the Lynda.com training video I authored with Scott Bourne titled, Aperture 1.5: Beyond the Basics.

Technorati Tags: ,