Recently in Photography

  Page 168 of 385 in Photography  

Thank Goodness for Camera WiFi

iphone-not-supported.png

It seems like it should work. But if you plug the Lightning to SD Card Camera Reader into your iPhone, all you get is a not supported message. Ack!

When I'm in super-nimble mode, I don't even want to bring my iPad (which of course does support the SD card reader). I just want a compact camera in one pocket and my iPhone in the other.

This is where camera WiFi saves the day. No adapters required. Today, I'm heading out with a Canon PowerShot S110 that connects to my iPhone 5S wireless via the Canon CW iOS app. And boom! I can quickly move images from one device to the other.

Personally, I would prefer it if Apple opened up the iPhone to use the SD Card Reader. It's always good to have a hardwire backup. Until then, thank goodness for camera WiFi.


Nimble Photographer Logo

This tandem has a high Nimbleosity Rating. What does that mean? You can learn about Nimbleosity and more by visiting TheNimblePhotographer.com.

Want to Comment on this Post?

You can share your thoughts at the TDS Facebook page, where I'll post this story for discussion.
pouches-for-modular.jpg

A primary goal with camera gear transport is to prevent metal objects from colliding with one another. There are a variety of ways to do this.

Many professional camera bags, such as those made by Lowepro, feature padded dividers to eliminate unwanted contact. This works great as long as your gear goes directly from the bag, to use, and back to the bag.

That's not always the way I work, however.

Often my camera bag is packed for traveling from one place to another, holding all of the equipment that I would need for that duration of the trip. Once I arrive at my destination, I most likely want to move about with fewer items, only selecting what I need for a particular shoot.

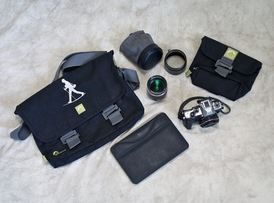
I'll have a flat shoulder bag packed in my suitcase, such as the Lowepro Photo Sport 18L Shoulder Bag or the Walking Man Shoulder Bag, then use pouches to protect individual items.

The Lowepro Photo Sport Shoulder Bag is a favorite of mine for travel.

The system can be quite efficient because I stow much of my gear in pouches in the large camera bag. Then I simply pull the items that I want and relocate them to the new bag. Essentially, it's a modular system for your camera gear on location.

Pouch features that I look for when designing this system include:

  • Squarish shape that is more efficient when packed in a bag.
  • Belt loop, and if possible, optional shoulder strap. This allows me to head out to dinner with just the pouch and no other bag at all.
  • A variety of colors. This helps to quickly identify one pouch from another.

The downside to this approach is that you can't get as much equipment in your "Point A to Point B" bag because of the pouches themselves. So I don't use this setup for every shoot. But for vacation travel and non-photography business, it works like a charm.


Nimble Photographer Logo

This pouch system has a high Nimbleosity Rating. What does that mean? You can learn about Nimbleosity and more by visiting TheNimblePhotographer.com.

Want to Comment on this Post?

You can share your thoughts at the TDS Facebook page, where I'll post this story for discussion.
I've been covering high school basketball this season with the Olympus OM-D E-M1 and the Olympus 75mm f/1.8 lens. As people see my shots online, the question has come up: Could I use this tandem instead of a DSLR to cover indoor sports?

The answer is a resounding, "depends."

Zach with Ball Photos by Derrick Story. OM-D E-M1, 75mm lens, ISO 3200, Aperture Priority f/1.8, 1/400th, +0.3 EV

For example, here's a note that I recently received from Joel, who is a photographer in the TDS community.

"I have had some issues with the 75mm Oly lens. I am shooting Dvision 1 college basketball in the best-lit arena in the Patriot League. I am able to use a combination of ISO settings starting at 1600 and going up thru 3200, simply dependent upon the aperture and shutter speed I desire. BUT, I am having some problems with focus slipping off my intended subject, or simply never locking in the first place. I don't have those issues with the 45mm lens."

Joel went on to ask if I were having the same issues with the Olympus 75mm lens.

The short answer is "yes."

My loss is higher with the 75mm than with the Canon 85mm f/1.8 on my 70D DSLR. So why do I keep shooting this season with the E-M1 and 75mm?

Congrats

The reason is because when I do get a shot I like, I love it. There's a certain feel that I get with the mirrorless kit that doesn't happen as often with other cameras and lenses. And as the season wears on, my percentage of good shots is rising. I'm having to learn how to shoot with this rig.

This is why my initial answer to the E-M1 vs DSLR is "depends." If I were shooting a single assignment that required the highest number of good images, I would choose my Canon DSLR and lenses. My percentages are better.

If, as the case for me this year, I have an entire season to build a collection of images for the high school yearbook, I'm sticking with the OM-D and 75mm.

Last night's shoot, for example totaled 723 frames for the JV game. I liked 219 images from that game. I loved a dozen of those shots.

For those of you who shoot basketball regularly, how do those numbers compare to yours? My guess is that they are a bit lower. And if you were shooting these types of assignments to pay your bills, you should go with a rig that gives you the best percentages possible. You don't want to miss the game winning shot.

As for me, I'm going to evaluate the body of work at the end of the season. Then I will decide. But for now, I'm going to stick with the E-M1 and 75mm and see how good I can get with them.


Nimble Photographer Logo

This kit has a high Nimbleosity Rating. What does that mean? You can learn about Nimbleosity and more by visiting TheNimblePhotographer.com.

Trade Show Shoes - The Movie

So, what do people wear on their feet when attending monster trade shows such as CES in Las Vegas? This floor level view provides some insights.

Recorded at CES 2014 at the Las Vegas Convention Center. I used a Canon S110 set at floor level. The movie was edited in Aperture 3.5 using the Slideshow tool.

Aperture Tips and Techniques

To learn more about Aperture, such as how to edit movies with this app, check out my Aperture 3.3 Essential Training (2012) on lynda.com. Also, take a look at our Aperture 3 Learning Center. Tons of free content about how to get the most out of Aperture.


The Digital Story on Facebook -- discussion, outstanding images from the TDS community, and inside information. Join our celebration of great photography!


This week on The Digital Story photography podcast: New Mirrorless Cameras on the Horizon; From the Screening Room: Douglas Kirkland: Storytelling Through Photography - Nimbleosity Report - Mark Your Stuff - All of this and more on today's show with Derrick Story.

new-fujifilm-dslr-announce.jpg

Story #1 - New Mirrorless Cameras on the Horizon - the CES announcements were fun, but we still have more to come with mirrorless cameras in the coming weeks. Leading off, Fujifilm is expected to announce a DSLR-styled camera on January 28. In the same timeframe, we're expecting new announcements from Olympus too. A few leaked images have appeared online, so it's best not to speculate too much at this point. It is safe to say, however, that mirrorless shooters will have new gear to tempt them.

Story #2 - From the Screening Room - Douglas Kirkland: Storytelling through Photography. This week's featured artist is the iconic photographer who photographed Marilyn Monroe and Elizabeth Taylor. In this title on lynda.com, Douglas talks about storytelling through the use of his photography, and how every image should have a message.

douglas-kirkland-lynda.jpg

You can watch Douglas in action by visiting the TDS Screening Room at lynda.com/thedigitalstory. While you're there, you can start your 7 day free trial to watch all of movies with Douglas, plus every other title in the library (including over 20 by yours truly).

Story #3 - The Nimbleosity Report - "Mark Your Stuff"

I know at first this might seem a little bit obvious, but I am surprised at how many photographers do not have their gear marked. There are a couple of approaches you can take, to ensure that you have a chance to recover your equipment, if misplaced.

The Whole Bag Approach - for those who don't want to label every item, you can simply make sure that you have your contact information clearly visible somewhere in your camera bag.

Label it All! - some photographers are more comfortable knowing that every piece of equipment they have as a label on it. If this is you, I don't think you necessarily need your name on every lens, but your cell phone number is probably a good idea.

Serial Numbers Yes, Engraving No - cameras and lenses already have engraved serial numbers, so you don't have to engrave your name which depreciates their value. Instead, make sure that you have all of the serial numbers for your equipment on file.

Virtual Camera Club News

Photo Assignment for January 2014 is White.

Artisan Cheese Festival: March 21-23, 2014 - This advanced workshop puts you on assignment to cover Artisan Cheese Festival. You'll experience a complex event assignment from the inside out, learning about client relations, shot list preparation, lighting techniques, post production, and more. Three days - $250

BTW: If you're ordering through B&H or Amazon, please click on the respective ad tile under the Products header in the box half way down the 2nd column on thedigitalstory.com. That helps support the site.

Listen to the Podcast

In addition to subscribing in iTunes, you can also download the podcast file here (30 minutes). You can support this podcast by purchasing the TDS iPhone App for only $2.99 from the Apple App Store.

More Ways to Participate

Want to share photos and talk with other members in our virtual camera club? Check out our Flickr Public Group. And from those images, I choose the TDS Member Photo of the Day.

Podcast Sponsors

lynda.com - Learn lighting, portraiture, Photoshop skills, and more from expert-taught videos at lynda.com/thedigitalstory.

Red River Paper -- Keep up with the world of inkjet printing, and win free paper, by liking Red River Paper on Facebook.

SizzlPix! - High resolution output for your photography. You've never seen your imagery look so good. SizzlPix.com.

Want to Comment on this Post?

You can share your thoughts at the TDS Facebook page, where I'll post this story for discussion.

Not every camera bag is right for all situations. But over time, most photographers settle on a style that best suits their general needs. Aside from rollers, the basic designs are sling, shoulder, and backpack. Here's a closer look at each.

Three Types of Camera Bags Three Types of Camera Bags - Sling (left), Shoulder, and Backpack.

The Camera Backpack

Backpacks, such as the Lowepro DSLR Video Fastpack 250 AW combine excellent storage capacity for your camera gear, laptop, and tablet with excellent comfort. Weight is distributed over both shoulders and hips (if you buckle the waistband). So you can explore for an entire day without much fatigue.

On the downside, access to your gear isn't as convenient as with shoulder and sling bags. And backpacks are sometimes problematic in crowded areas where you might accidentally bump others with it.

Best for... carrying gear from point A to point B, travel, hiking, and when you need to have lots of equipment with you over an extended period.

The Shoulder Bag

Shoulder bags, such as the Lowepro Urban Reporter are perfect during shoots when you need to access your gear quickly. You can position the bag to hang in the front while your working, then slide it around to your back while relocating to a different area.

Shoulder bags are not as convenient when walking long distances or transporting lots of gear. Because all of the weight is centered on one shoulder, photographers will tire more quickly.

Best for... quick access during a shoot and for working in crowded areas. Also a bit more stylish for urban shooters who also attend meetings.

The Sling Bag

Sling bags, such as the Lowepro Transit Sling, offer an alternative to the traditional backpack.

Slings provide faster access to gear, while maintaining backpack-like capacity, and to some degree, comfort if you use the supplied stabilizing strap that helps distribute weight off one shoulder. Worn properly, you can carry more gear for longer periods with a sling than a shoulder bag - but still not as long as a good-fitting backpack.

Best for... providing fast access to a moderate amount of gear. Slings are also well suited for those who prefer backpack styling over shoulder bags. They're easier to reposition in crowded areas than backpacks.

What Do I Use?

My everyday on-the-go bag is the Urban Reporter 150. When traveling or moving gear from point A to point B, I prefer the DSLR Video Fastpack 250 AW that also has a padded area for my 15" MacBook Pro. And when I'm on the trail, I love the Lowepro Photo Sport Pro 30L AW Backpack that not only protects my camera equipment, but has enough storage for an overnight campout.


Nimble Photographer Logo

This camera bags have a high Nimbleosity Rating. What does that mean? You can learn about Nimbleosity and more by visiting TheNimblePhotographer.com.

Want to Comment on this Post?

You can share your thoughts at the TDS Facebook page, where I'll post this story for discussion.

The Evolution of Camera WiFi

facebook-reporting.png

Built-in camera WiFi has evolved from novelty to useful.

Two factors have improved this experience. First, cameras are able to establish their own hotspots and not depend on an existing WiFi networks. This provides much more flexibility. And second, companion apps that run on mobile devices now interact more smoothly with the cameras and provide a variety of functions.

In my latest Macworld Magazine article, How to use Wi-Fi for an expert photo workflow, I detail the workflow I used to cover CES in Las Vegas, using the Olympus OM-D E-M1 and Canon 70D with their respective iOS apps running on an iPhone 5S and iPad mini with Retina Display.

A few years ago, I would gather information and photos during the day, then go back to my hotel room at night to process and publish. Now, the expectation is to publish over the course of the day. Camera WiFi and improved mobile hardware and software make realtime reporting feasible.

Show organizers and cellular providers also helped our cause by improving the networks at the Las Vegas Convention Center. As a result, I was able to shoot, edit, and publish at the event.

If you find this stuff interesting, then take a look at How to use Wi-Fi for an expert photo workflow and see what you think.


Nimble Photographer Logo

This workflow has a high Nimbleosity Rating. What does that mean? You can learn about Nimbleosity and more by visiting TheNimblePhotographer.com.

Want to Comment on this Post?

You can share your thoughts at the TDS Facebook page, where I'll post this story for discussion.

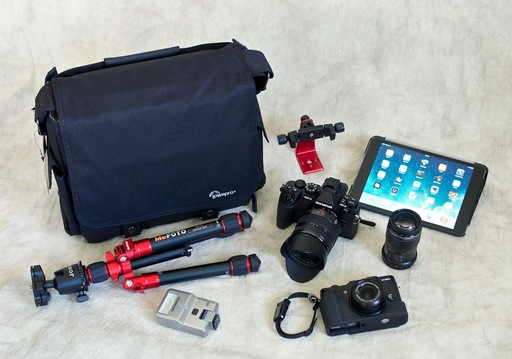
The folks over at In My Bag wanted to know what I wast packing in my Urban Reporter 150. So I laid it out for them, and added a new entry to the Nimble Photographer Fit Kit page.

Derrick-Story-Fit-Kit-E-M1-1600.jpg

Fit Kit 12 - Everyday Work Bag


Nimble Photographer Logo

This kit has a high Nimbleosity Rating. What does that mean? You can learn about Nimbleosity and more by visiting TheNimblePhotographer.com.

Want to Comment on this Post?

You can share your thoughts at the TDS Facebook page, where I'll post this story for discussion.

mac-pro-internal.jpg

Yes, you can spend thousands upon thousands for a new Apple Mac Pro. But once you've finished the fun of seeing how high you can go, what's a reasonable configuration for working photographers?

I spent some time with the configurator and designed a system for less than $5,000. Yes, that's a lot of money. But I also included a new 27-inch Apple Thunderbolt Display, thinking that most of us have outdated displays right now.

I started with the Quad-Core option (3.7GHz quad-core with 10MB of L3 cache). I increased the RAM memory from 12 to 16GBs. For storage, an upgrade was definitely needed since the default is only 256 GBs. (This is even the case if you start with the more expensive 6-Core and Dual GPU.) So I upgraded to 1TB of PCIe-based Flash storage. That costs $800 right there.

I left the graphics card alone - Dual AMD FirePro D300 GPUs with 2GB of GDDR5 VRAM - but did add the 27-inch Thunderbolt Display for $999. This raised the total price for the setup to $4,898.00.

Now it's true that you could buy the base unit for $2,999 with the 27" display for $999 and provide the upgrades yourself. In that case, your initial order is $3,998... with more expenditures to come.

Want to Comment on this Post?

You can share your thoughts at the TDS Facebook page, where I'll post this story for discussion.


twitter.jpg Follow me on Twitter


the-lux-diy-camera.jpg

The Nimble Photographer has had a fast start to 2014. Here are some of the latest posts on The Nimble Journal.

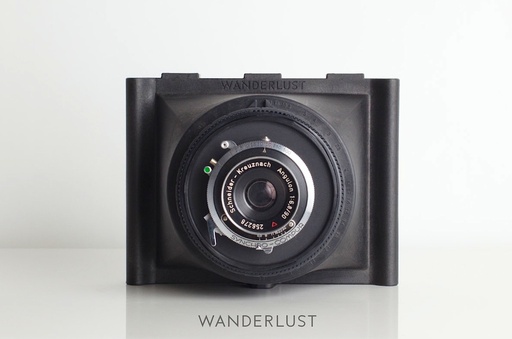
This Could Change Our World - The possibilities of 3D printing. (The Lux camera shown here was output by a 3D printer, designed by Kevin Kadooka.)

It's Still Work if Your Don't Get Paid - The endless opportunity to apply your craft for free.

The Shakedown - Yes, the ongoing battle between Las Vegas and your wallet.

Assignment Gear - What I pack for a light-footed event job.


Join me on my Instagram site as I explore the world of mobile photography. And now Instagram features 15-second movies too.


twitter.jpg Follow me on Twitter