Recently in Show Notes

  Page 98 of 99 in Show Notes  

"Lightroom vs Aperture" - Podcast 14

Lightroom (top) & Aperture

Adobe has just announced the public beta Lightroom, right on the heels of the recent Aperture announcement by Apple.

Both applications are robust photo editors, which is different than image editing. Photo editing is the process of choosing the best images from any given shoot. It is comparing and then selecting. Image editing is adjusting the actual pixels of a picture, such as changing its brightness.

Even though Aperture and Lightroom provide solid image editing tools, their real strength is their ability to help you quickly organize and output the best shots from your shoots.

When comparing these two applications, I would say that Aperture has more features and more innovative tools, such as Stacks and the digital loupe. Lightroom gets the nod for its better performance on the average modern laptop and for providing options for managed or unmanaged libraries. A managed library is where your pictures are uploaded into a container (library) that the application maintains. Unmanaged means that you store your pictures wherever you want, and Lightroom will create pointers to them. The advantage of managed libraries is that you can add metadata on import, and even change the format and content of the file names. Aperture favors the managed library approach while Lightroom gives you the option.

You can download a copy of Lightroom here. Anyone wanting to try out the beta should have Mac OS X 10.4.3, a 1GHz PowerPC G4 processor or better, 768MB of RAM, and a 1,024-by-768-resolution screen, according to the beta's tech specs.

After having worked with both applications, my feeling is that each has a place in the world of digital photography. Which one is right for you? Listen to this week's podcast and decide for yourself.

You can download the "Lightroom vs Aperture" podcast here (35 minutes).

Technorati Tags: , ,

Histogram Example

The histogram is a useful tool for determining and correcting exposure on both the camera and in your computer's image editor. The histogram is actually very easy to understand once you learn its basic components. The information on the left side of the graph represents the dark tones in your picture. On the right side you see a graphical representation of the highlight detail. The middle area represents the "gamma," or middle tones.

The Histogram on Your Camera's LCD Monitor

When you take a picture and review the image and its histogram on your camera's LCD monitor, you can accurately determine the exposure by looking at how the information on the histogram is distributed. If, for example, you're shooting a normal outdoor landscape with a broad tonal range, your histogram should have information throughout the graph from left to right. If the information is skewed to the left, however, then your picture is probably underexposed. If the information is tending to the right side of the graph, then your picture is most likely overexposed.

Uncorrected Portrait
Using the Histogram in the Levels control panel can help you easily make exposure adjustments. Here's an uncorrected portrait. Notice the open gap on the right side of the graph information.

The above interpretation works for most shooting situations. But, if you're in very bright conditions or a dark environment, then you have to keep a couple things in mind. A bright scene, such as a skier on a snowy slope, should produce a histogram that is skewed to the right. That's because most of the information in the shot is bright. An evenly distributed histogram would actually produce a dull snowy scene. Same goes for dark interiors. They should be skewed to the left. Once you get the hang of matching histograms to shooting situations, they become a powerful ally in determining the proper exposure.

Using the Histogram in Photoshop

You can also use the histogram to make exposure adjustments in Photoshop (or your favorite image editor) after you've moved the images from your camera to your computer. Generally speaking, you can find the histogram in the "Levels" adjustment panel (Image > Adjustments > Levels).

Corrected Portrait

Using the controls is straightforward. I usually start by moving the highlight pointer (right) to the right edge of the histogram, the shadow detail pointer (left) to the left side of the histogram, then adjusting the gamma (middle pointer) to my taste. This isn't a hard and fast approach, but it's a good starting point. Take a look at the adjusted image and how the histogram pointers have changed.

Photo Assignment

It's official. I've launched the Photo Assignment project. This month's theme is "Ice." You can read all of the details in this weblog post. We're going to have a lot of fun with Photo Assignment, so be sure to join in.

=====================

Listen to the Podcast

Now that I have your curiosity piqued, it's time to listen to today's audio show titled, "Learning the Histogram." You can download the podcast here (30 minutes).

Technorati Tags: , ,

I think being the event photographer is a blessing. Whether I'm at an office party, family gathering, or celebrating with friends, my camera enables me to move effortlessly from one conversation to another. If I'm feeling stuck, I can always say, "Excuse me, but I see a shot over there I need to grab."

The camera also facilitates introductions. "Hi, I'm taking pictures for the host. My name is Derrick. Do you mind if I grab a quick shot of you and your wife?" The next thing you know you're in friendly conversation. The role of holiday photographer is much better than standing there with a drink in your hand wondering how long you have to hang around.

Bounce Flash

Business Card Bounce Flash

I think holiday events are a great time to try the bounce flash technique. Instead of pointing the flash directly at the subject, you "bounce" it off the ceiling. The light is much more diffused, like a cloudy day, and can be very flattering for portraits. One of the reasons that I think holiday parties present a good opportunity for this technique is because they're often in homes with lower ceilings that are painted a shade of white -- perfect for bounce flash.

One drawback to bouncing light is that the subject's eyes can go dark because the illumination is from above. A great trick to fix that is to attach a plain white business card to the flash head with a rubber band as shown in this illustration. It "kicks" just enough light toward the eyes to brighten them up while still getting the benefits of bounce flash.

Generally speaking, I increase the ISO to 400 for bouncing because you do lose some light from the added distance and the surface of the ceiling. Otherwise, you should be able to use Program mode and auto flash. Try it!

Software Links

Windows
QuickTime Pro
Ulead CD and DVD PictureShow
Ulead DVD Workshop

Mac
QuickTime Pro
BetterHTML Export plug-in for iPhoto
Apple iLife Suite includes iPhoto, iMovie, and iDVD

All Platforms
Flickr (I've linked you to my Flickr page so you can see an example).

=====================

Listen to the Podcast

Now that I have your curiosity piqued, it's time to listen to today's audio show titled, "The Holiday Photographer." You can download the podcast here (28 minutes).

Technorati Tags: , , , ,

"Photography Etiquette" - Podcast #11

Portrait Subject
I try to get a model release at the end of every shoot. Plus, I think it's courteous to offer extra prints to the subject if I plan on publishing the shot.

Much of good etiquette, while working as a photographer, comes from common sense. Things like: don't interfere with the action, don't obstruct the mother's view at a wedding, be frugal with your flash in darkened environments, and ask permission to publish photos of people whom you can recognize in the shot.

Photographers who publish, or who are aiming to do so, should carry a model release and business cards with them. The cards are useful for identifying yourself to someone you just photographed. It also provides the subject a way to get a hold of you in the future. The model release is the tool you use to secure permission to publish a photo that shows the subject's likeness.

As I said in the show... I'm not a lawyer. This is not legal advice. But my experience has taught me to get model releases whenever possible -- even for shots of family and friends. If I do publish the photo, I like to let the subjects know where it was published. If possible, it's a nice gesture to send the subject a copy of the publication.

If the photo is going to be used on the label of a commercial product, such as instant coffee, I think it's wise to negotiate a fee with the subject and draft another, more specific model release.

Finally, if the person asks you to send a picture, and you agree to do so, please follow up. All too often photographers get distracted and forget to fulfill their end of the bargain.

Here's a sample model release that I use. I'm sharing this for illustrative purposes only. But you can use the language if you wish.

=====================

Photographic Subject Consent Form

I hereby give my consent for appearing as a photographic subject, and I release to [photographer's name] all rights of any kind included in the media product in which I appear.

This is a full release of all claims whatsoever that I or my heirs, executors, administrators, have now or hereafter against [photographer's name] or his employees, regarding any use that may be made of said photographic reproductions.

I understand that it is the purpose of [photographer's name] to use the material in a legitimate manner not intended to cause embarrassment or harm. Images published on the [photographer's name] web site do not include name or other personal information.

I have read this entire document, understood the contents, and I have willingly agreed to the above conditions.

Print names	
Date	
Signatures 		
Address (optional)	
Phone	
Subject's description		
Location	

=====================

Listen to the Podcast

Now that I have your curiosity piqued, it's time to listen to today's audio show titled, "Photography Etiquette." You can download the podcast here (21 minutes).

Technorati Tags: , ,

"Low Light Photography" - Podcast #10

Nikon 50mm f-1.8 lens

Digital cameras excel in low light, especially DSLRs that enable you to increase your ISO to 400 and above without excessive compromise in image quality... or, at least, it's often worth the tradeoff to get the shot.

But there's more you can do beyond simply jacking up the ISO. An effective technique to capturing good images in dim conditions is to actually get more light to the image sensor. An easy way to do this is acquire a "fast" lens, such as a 50mm prime lens that's rated at a maximum aperture of f-1.7 or f-1.8. An f-1.8 lens, when set to its maximum aperture, transfers much more light to the image sensor than a zoom lens with a maximum aperture of f-4, for example. Take a look at this sequence of f-stops on a standard 50mm lens:

1.8 - 2.8 - 4 - 5.6 - 8 - 11 - 16 - 22

Each of these f-stop settings correspond to one full ISO setting:

100 - 200 - 400 - 800 - 1600 - 3200

So let's say that your f-4 zoom lens requires you to increase your ISO setting to 800 to get a reasonable handheld shot (let's say 1/30th or a second at f-4) in dim lighting. In that same lighting condition, your 50mm prime lens set to f-1.8 would allow you to shoot the same shot at ISO 200 (1/30th of a second at f-1.8) instead of ISO 800. By letting more light through to the image sensor (f-1.8 vrs f-4), you are able to lower the ISO setting using the same shutter speed.

Speaking of shutter speeds, they fall into this equation also. Here's their sequence:

1/15th - 1/30th - 1/60th - 1/125th - 1/250th - 1/500th

So with a f-1.8 lens, you may decide to keep the ISO at 800 and increase the shutter speed to 1/125th of a second instead. This would make it easier to freeze action. These are the sort of options you enjoy with a "fast" lens. Here are the numbers again, all stacked on top of each other:

f-stop:....1.8.......2.8...........4.........5.6...............8.............11

ISO:.......100.......200........400......800............1600........3200

Shutter:.1/15th...1/30th..1/60th.1/125th....1/250th.....1/500th

What are examples of these magical "prime" lenses. You can get a Nikon 50mm f-1.8 lens brand new for $105, and cheaper used. Same goes for Canon mount. A Canon 50mm f-1.8 lens can be had brand new for $80, and even less used.

Listen to the Podcast

Now that I have your curiosity piqued, it's time to listen to today's audio show titled, "Low Light Photography." You can download the podcast here (34 minutes).

Technorati Tags: , , ,

Ultrapod II
The UltraPod II is one of my 12 favorite photo gadgets. Read on for the other 11...

Every photographer has his or her favorite gadgets. This week's show lists 12 attractive ones that I think will interest you, and might make the perfect gift for a special photographer on your holiday shopping list. Here are the links for the dozen I discussed on Podcast #9.

  1. Tamrac Photographer's Vest -- There are lots of great vests on the market, and I've liked most of what I've seen. This Tamrac vest comes in black or khaki and costs about $90 (at the top of the range I would pay). You can also buy quality vests for as low as $40 from Campco and around $65 from Domke.
  2. UltraPod II -- I think this is one of the best pocket tripods available. Works for light DSLRs as well as compacts. You can score one of these for about $22.
  3. Cokin Graduated ND filter -- Great for balancing a bright sky with the landscape forground. You can get a kit with 3 filters and the holder for about $55.
  4. SanDisk Ultra PC Card Adapter for CompactFlash -- Laptop users with a PC Card slot can upload images from their CompactFlash memory card with a simple PC Card adapter that costs less than $10, and works great! A good stocking stuffer...
  5. Belkin 15-in-1 Reader Writer -- This speedy USB 2.0 reader/writer can handle just about any type of memory card. And the price has come down recently so you can buy one for less than $30.
  6. Tamrac Expedition 3 Photo Backpack -- I've discussed this backpack, and its bigger sibling, the Expedition 4, in a recent review. I like the Expedition 3 because of its more compact design and affordable $50 price tag.
  7. Giottos Rocket Air Blaster -- I've posted a review of the Rocket Air Blaster because I was impressed by its design and ease of use. This is a great way to kick the "canned air habit" for cleaning lenses, and it only costs about $11. If properly used, it's also safe for blowing dust off DSLR image sensors.
  8. iPod Camera Connector -- iPods (full size models with color screens) are great devices for storing photos as well as music. The Camera Connector costs less than $30 and enables you to connect your camera's USB cable, or the Belkin 15-in-1 Media Reader to your iPod and upload pictures for backup and viewing. You can transfer the images to your computer when you return home.
  9. Tamrac N-5053 Camera Strap -- This lightweight, strong strap holds most digital SLRs and memory cards and features rubber tracks to prevent slippage. Two neoprene memory card holders provide convenient access to memory cards while shooting. The quick-release buckles are interchangeable with other Tamrac quick-release camera straps. They cost about $20 each.
  10. Sony NiMH rechargable batteries and charger -- Power hungry electronic flashes and cameras demand good batteries. This Sony kit is a bargin for $20.
  11. LensPen -- So how do you clean those hard to get areas on your digital camera, such as the optical eyepiece? The folks at LensPen have a solution, and my experience is that it works great. You have lots of different sizes to choose from. I find myself reaching for the miniPRO model most often. You can buy it directly from the LensPen site for $15.
  12. Lowepro Photo Gloves -- I've saved one of my most favorites for last. These gloves keep the hands warm, yet provide enough dexterity to operate your camera. Plus they look great! You can buy them for for less than $20... be sure to get the right size!

Listen to the Podcast

Now that I have your curiosity piqued, it's time to listen to today's audio show titled, "12 Photo Gadgets for Gifts" You can download the podcast here (31 minutes).

Technorati Tags: , , ,

"Hottest Digital SLRs" - Podcast #8

This week, I take a look at my favorite Digital SLRs. I start with the megapixel king in this roundup, the Canon 5D, and work down the list from there. All of these cameras are excellent. One of them may be right for you.

Canon 5D DSLR
The Canon 5D is the 12.8MP king in this roundup of advanced cameras...

  • Canon 5D -- $3,300 without lens or memory card. The Canon 5D is a "full frame" 12.8 Megapixel CMOS sensor. Full frame means that the image sensor (35.8 x 23.9mm) is roughly the same size as 35mm film. So your existing collection of lenses behave similarly on the 5D as they do mounted on your film SLRs. This feature is great if you have a handful of EF lenses; not as good if you've recently purchased EF-S lenses that don't work on this camera. RAW file size is approx. 12.9MB (4,368 x 2,912) and Large/Fine Jpegs are approx. 4.6MB (4,368 x 2,912). Use your best lenses on the 5D to get the highest quality results.
  • Nikon D2X -- $5,000 without lens or memory card. Nikon's CMOS image sensor (23.7 x 15.7mm) is smaller than the Canon 5D resulting in a 1.5X magnification factor for your lenses. This is a rugged, well-built SLR body that provides great resolution, wide tonal range, and is extremely responsive. You have good connectivity with the USB 2.0 interface and optional WiFi transmitter. Other niceties include good battery life, fast CF write performance, and fast start up time. Full image size from this 12.4 MP sensor is 4,288 x 2,848.
  • Nikon D200 -- $1,700 without lens or memory card. The much-anticipated Nikon D200 uses a 10.2MP sensor to capture sharp, clean high resolution images that you can preview on its 2.5" LCD monitor. Instant "power up" and almost immeasurable shutter lag will make this DSLR a favorite among sports photographers and photojournalists. It produces both Raw and Jpeg images as large as 3,872 x 2,592 pixels.
  • Canon 20D -- $1,300 without lens or memory card. With its 8.2 MP image sensor, the 20D combines high performance with a rugged magnesium alloy body, plus lots of shooting modes and features. Canon's EF-S lenses are perfectly suited for the 20D as well as the extensive line of regular EF glass, although with a 1.6X magnification factor for the latter. Other notables include fast start-up time, 5 fps second burst mode, and 9-point AF system. RAW file size is approx. 8.7MB (3,504 x 2,336) and Large/Fine Jpegs are approx. 3.6MB (3,504 x 2,336).
  • Canon Digital Rebel XT (350D) -- $780 without lens or memory card, $880 with 18-55mm EF-S Lens. The Digital Rebel XT sports an 8MP CMOS sensor in a very light and compact body. Photo quality is excellent and on par with the 20D at low ISOs. The 20D performs slightly better at ISO 800 and above. The Rebel shoots up to 3 fps and has a 7-point AF system. Battery life isn't as good as the 20D, so be sure to buy an extra one with the camera. RAW file size is approx. 8.3MB (3,456 x 2,304) and Large/Fine Jpegs are approx. 3.3MB (3,456 x 2,304).
  • Nikon D50 -- $650 without lens or memory card, $800 with 18-55mm DX Zoom Nikkor lens. The D50 is high quality and very affordable for a DSLR. Its 6.1MP sensor provides plenty of resolution for large prints and cropping. The battery life is outstanding and it sports a 2" LCD monitor. Burst mode is up to 2.5 fps and it uses a 5-area sensor for autofocus. The D50 performs very well in low light situations. Image size is 3,008 x 2,000 pixels.
  • Nikon Coolpix 8800 -- $860 with 35-350mm built-in lens. This 8MP "all in one" camera isn't a Digital SLR, but might appeal to the serious photographer who wants high performance in a compact package. It can capture both Jpeg and Raw formats (3,264 x 2,448), plus includes all of the shooting and metering modes most photographers would want. Yet, it weights only 21 ounces without battery.

Listen to the Podcast

Now that I have your curiosity piqued, it's time to listen to today's audio show titled, "Hottest Digital SLRs" You can download the podcast here (35 minutes).

Technorati Tags: , , ,

"ISO Settings and More" - Podcast #7

The main discussion in this week's show focuses ISO settings (and how far you can go with them). I also revisit the memory card fiasco from last week and touch on the new WiFi cameras offered by Nikon and Canon.

ISO Settings

ISO Setting

Sometimes referred to as film speed, ISO speed is actually a better term for expressing the light sensitivity of your digital camera. ISO stands for International Organization for Standardization. This entity has established many standards, including the light sensitivity of photographic materials. If your camera has multiple ISO speed settings, then you can use these adjustments to increase the light sensitivity of the image sensor. The default setting for most digicams is ISO 100. This is the speed setting for general photography. If you’re in a low-light situation and need to increase the sensitivity of you image sensor, change the ISO Speed setting from 100 to 200, 400 or even 800, if necessary. Each setting is the equivalent to one f-stop of light.

The general rule of thumb is to keep your ISO setting as low as possible on compact cameras (100 or 200), but understand that you have more latitude with Digital SLRs, which have larger image sensors and more robust electronics. I've had good luck with my Canon Rebel XT at ISO 400 and 800.

Noise Reduction Plug-ins

If you do end up with an image that's nosier that you'd like, here are some Photoshop plug-ins to help you correct the image:

Listen to the Podcast

Now that I have your curiosity piqued, it's time to listen to today's audio show titled, "ISO Settings and More" You can download the podcast here (30 minutes).

Technorati Tags: , ,

If you need a good camera while on the go, I'd recommend that you start by comparing compact models. They're easier on the wallet and fit into a pocket or purse. Compact cameras typically range from 2 to 7 megapixels of resolution. Their picture quality can be outstanding, but they usually don't offer the array of features and controls that larger models do. The zoom lens tend to be 3X, which translates into 35-105mm for most models.

After you listen to this week's podcast, use this handy checklist to help you, or a friend, find the right digital camera. I recommend that you print it out, then mark the features that are important to you. Then bring it with you to the store.

Compact Camera Features Checklist

Megapixels

  • ( ) 3-5 megapixels -- great snapshots, quality enlargements possible up to 8" x 10"
  • ( ) 5-8 megapixels -- quality prints possible up to 11" x 14", ability to crop and still have enough resolution for decent sized enlargements

Memory Card (Spare Recommended)

  • ( ) Are the read and write speed specifications of your spare memory card matched to camera for maximum performance? This is particularly important for cameras that have robust burst modes and high quality video capture. Generally speaking, you'll need a spare 256MB card for 3-4 MP cameras, 512MB for 5-7MP cameras, and a 1GB card if you plan on shooting any video.

Batteries (Spare Recommended)

  • ( ) Rechargeable Lithium -- most common these days. Designed specifically for the camera by the manufacturer
  • ( ) Rechargeable NiMH AAs -- Are more bulky, but you can always use regular AA alkalines in an emergency
  • ( ) Charger included in camera kit?
  • ( ) Charger compact and easy to pack?

LCD Monitor

  • ( ) Fixed back -- Mounted to the back of the camera
  • ( ) Vari-angle -- can swivel screen, and sometimes rotate. Versatile viewing options for shooting low angle compositions or for holding the camera about your head.
  • ( ) Screen size -- 1.5" to 2.5" Bigger is better if you like to show others your pictures on the camera's LCD monitor
  • ( ) Image quality -- sharp, smooth motion, rich colors
  • ( ) Magnification -- allows to "zoom in" on recorded images to study detail. Very useful function, but some cameras implement this better than others
  • ( ) Data viewing -- enables to review settings such as white balance, ISO, and flash

Flash

  • ( ) Settings for built-in flash easily accessible

Shooting and Exposure Modes

  • ( ) Continuous or Burst mode -- How many frames can be recorded without pause to write to memory card
  • ( ) Subject shooting modes -- predefined settings for action photography, as well as portraits, nature, low light, and close-up
  • ( ) Self-Timer -- Some models have 2 sec and 10 sec settings
  • ( ) Remote Control -- Is a remote control included in the kit or available as an accessory?
  • ( ) Macro -- How close can you focus?

White Balance

  • ( ) Are settings easily accessible?
  • ( ) Is there a good variety or white balance presets?
  • ( ) Is there a manual white balance setting for tricky lighting situations?

Exposure Compensation

  • ( ) Is the exposure compensation setting easy to get to, or buried deep within the menu?

Special Features

  • ( ) Movie mode -- records QuickTime video at 10, 15, or 30 frames per second and/or at 160x120, 320x240, or 640x480 pixel dimensions
  • ( ) Panorama mode -- provides visual guides in the LCD viewfinder for aligning overlaping frames for panorama images
  • ( ) Special effects -- usually includes Black & White mode, sepia, and vivid colors
  • ( ) Audio annotations -- enables to add short voice recording to images
  • ( ) Weather resistant -- provides for photography in rain or sometimes even shallow immersion. Is there an underwater housing available for your model?

Software

  • ( ) Bundled software -- How good is the included software for special camera functions such as creating panoramas?
  • ( ) Will your new camera work with your existing photo software?

Listen to the Podcast

Hope you enjoy today's audio show titled, "Compact Camera Buying Tips" You can download the podcast here (46 minutes).

Technorati Tags: , ,

"Raw Workflow" - Podcast #5

As we wait for Aperture and software like it to help us manage Raw files more efficiently, many of us are forced to using two or more applications to complete our workflow.

When I was shooting with a Canon 10D, I stuck with iPhoto 5 for organizing and browsing my .CRW files. But everything broke with my new Canon 5D that produces .CR2 files. iPhoto 5 couldn't read those images until the recent Mac OS X 10.4.3 update that added .CR2 file compatibility (among others). Even so, iPhoto just seems too underpowered for this type of work.

So I've been playing with different combinations of software that will help me manage my Raw files, and this is what I discuss in this week's audio show. I'm a big fan of editing Raw files with Adobe's Camera Raw, but I'm not crazy about Adobe Bridge, especially the length of time it takes to render thumbnails for my .CR2 files.

As a result, I've been playing with Canon's Digital Photo Professional (version 2) to browse my Raw images. It renders thumbnails quickly and provides lots of metadata that helps me understand what went right and what didn't. Minolta, Nikon, and Olympus also provide bundled software for managing their Raw files. If anyone is using those flavors, please post a comment with your impressions of them.

Canon Digital Photo Pro
Canon's Digital Photo Professional software has come of age with version 2.

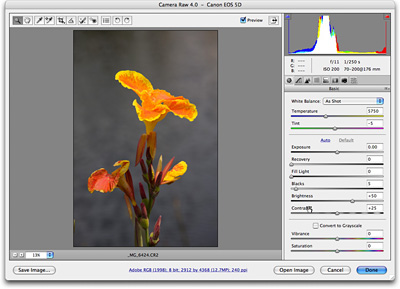
As much as I like the Canon software for browsing, I don't enjoy it for editing. So once I find a picture I want to work on, I note its file name and open it in Camera Raw. I like to use the "Auto" settings in Camera Raw 3.2 (available with Photoshop CS2) as a starting point for my image editing. You can override any of the auto settings by simply sliding the adjuster. But I've found that the Auto settings are often a good starting point.

Camera Raw Adjusters
The Auto settings are often a good starting point for image editing in Camera Raw

Once I've adjusted my Raw image, I save it as a Photoshop file that becomes my working master. Then if I need to post the picture on the web or share via email, I save a copy as a JPEG. I mentioned in the audio show that I think it's important to retain the original file number through all of these iterations. It makes it easier to find these files later. So the original Raw file might be "IMG_0421.CR2" then the Photoshop master could be "Sunset_0421.psd" then the working Jpeg could be "Sunset_0421.jpg".

For some of us, new applications such as Aperture will improve this process. But for others, you could get by with using your bundled software and spending less than $100 for Adobe's Photoshop Elements 4, and work quite effectively.

Listen to the Podcast

Now that I have your curiosity piqued, it's time to listen to today's audio show titled, "Raw Workflow" You can download the podcast here (30 minutes).