Recently in Show Notes

  Page 97 of 99 in Show Notes  

"Killer Panoramas" - Podcast 24

Burney Falls, CA

Digital panoramas are a great way to broaden the width of your lens, add resolution to your final print, and better convey the feeling of the location. By following just a few simple techniques, you can begin creating your own panoramas today.

The concept is to shoot a series of images with your digital camera, then stitch them together on the computer. At first, this might sound like a daunting task. But today's stitching software is so good that the procedure is almost automatic. I've been using Adobe's Photomerge software that's part of Photoshop Elements 4, which first came out for Windows, but now there's a Mac version too. (BTW: Photomerge is also part of Elements 3 on both platforms.) I also like the Photostitch software that comes bundled with Canon cameras.

To use Photomerge, simply put the series of images you want to stitch together in a folder. Then open Photoshop Elements and choose: File > New > Photomerge.

Photomerge as Part of Elements

Direct Photomerge to your series of images, then follow the prompts. Before you know it, you'll have your own stunning panorama. You can apply this technique to indoor photos too, such as this image I captured inside Grand Central Station in New York with a 2-megapixel Canon Digital Elph compact camera.

Grand Central Station, NYC

Listen to the Podcast

Now that I've piqued your curiosity, it's time to listen to today's audio show titled, "Killer Panoramas." You can download the podcast here (28 minutes).

Technorati Tags: , ,

Photo Web Site

A well-designed website to show off your photography is an effective store front for photographers. In this podcast, I discuss the importance of having a web presence, for amateurs as well as professionals. The process of assembling your images for online publication has similar benefits to putting together a print portfolio. It forces you to cull your best work and think about your strengths and weaknesses as a craftsman and an artist.

I then cover a few tips for building a site quickly. Today's web tools make this process much easier than a few years ago. I recently redesigned my Story Photography web site in just 3 hours using Apple's new iWeb application. I wrote about this experience in the post titled, Putting iWeb to the Test. You might want to read this post, no only for my description of the process, but also because there are lots of comments, pro and con, about iWeb as a Web building application.

Giles Turnbull also posted a good overview of three Mac web builder tools in his article, Mac OS X Web Builder Face-Off. Windows users have some solid options too. The leading contender is time-tested Dreamweaver 8, but it's a pricey $399 -- probably more than you want to spend. But fear not, you can get NVU, an open source web authoring tool for free. It's available for download for Windows, Linux, and Mac platforms.

Listen to the Podcast

Now that I've piqued your curiosity, it's time to listen to today's audio show titled, "Build Your Own Photo Web Site." You can download the podcast here (33 minutes).

Technorati Tags: ,

Bride

Preparation is the key to success for wedding photography. First, make sure you've gone over a shot list with the bride (and groom if he's interested) to ensure that you're on the same page, literally. You can use this shot list as a starting point. Let the bride add and subtract items as it suits her event. Help her organize the group shots so you can maintain flow throughout the day. For example, don't take all of the group shots right after the ceremony if possible. It slows down the pace too much.

Make sure your equipment is in order too. Bring a backup camera, flash, dedicated extension cord, plus lots of batteries, memory cards, and film (if film is part of the assignment). Test your setup before the actual shooting begins. This is especially important for flash photography.

If you have the time, consider attending the rehearsal the night before. This gives you the opportunity to go over the shot list one more time with the bride, scout out the location, watch the ceremony, and meet the family. Plus, customers always seem so impressed when I show up for the rehearsal. It starts the event out on a good foot.

Once the wedding is over, process you images in a timely manner. Couples like it when they can peek at their wedding pictures right after they get back from the honeymoon.

Listen to the Podcast

Now that I've piqued your curiosity, it's time to listen to today's audio show titled, "Wedding Photography Tips." You can download the podcast here (33 minutes).

Technorati Tags: , ,

"Metering Modes" - Podcast 21

Metering Modes

Evaluative metering is the most popular mode for determining exposure on digital cameras. But many intermediate and advanced models have other options such as spot, partial, and center weighted. What's the difference between them?

In this podcast I cover all four metering patterns to help you choose the best one for any given situation. Additionally, I talk about how the camera's light meter often sees the world differently than how it appears with your two eyes.

I also announce the topic for the next photo assignment: Friends. As of the end of February, we're closing the books on the "Fur" assignment and beginning the next round for March. You can interpret "Friends" in any creative way you see fit. I hope you come up with something interesting, and submit it by the end of the month.

Listen to the Podcast

Now that I've piqued your curiosity, it's time to listen to today's audio show titled, "Metering Modes." You can download the podcast here (32 minutes).

Technorati Tags: , , , ,

Aperture

No question RAW photography provides shooters with more quality options than standard JPEG formats. But until 2006, the workflow for managing RAW files was clunky at best.

The problem was that we really didn't have a pro-level integrated environment for organizing, editing, and outputting RAW files. The general workflow was to open here, store there, edit with this, then, create a new file that had to be managed too. Software companies such as Adobe, Apple, and Light Crafts realized that there had to be a better way, and then did something about it.

As a result of their efforts (and others too), we are now entering the New Age of RAW Photography. Integrated environments with smooth workflows enable photographers to focus more on taking their shots and less on managing them. Applications such as Apple Aperture, Adobe Lightroom, and Light Crafts Lightzone are leading the way.

Another factor is that our input devices, also known as digital cameras, are much improved. We no longer have inferior images as the starting point for the photographic process. Having quality data upfront means that if we apply good shooting technique, we don't have to engage in hours of post production just to get a "photographic" image.

In this audio show, I discuss the notion that it's time for us to refocus our efforts on taking good pictures, then leverage these new tools to quickly manage our RAW files for beautiful output.

Listen to the Podcast

Now that I've piqued your curiosity, it's time to listen to today's audio show titled, "New Age of RAW Photography." You can download the podcast here (32 minutes).

Technorati Tags: ,

"Talking with the Shooters" - Podcast 19

Story Interviewing Ben Long

While on a recent Geek Cruise to Mexico, I had the opportunity to talk with other photographers about their approach to these excursions, including what equipment they used. I found these discussions fascinating, and I hope you will too.

I start off the show by telling a story about one of my adventures in Puerto Vallarta. I then interview Lynn Lampert who had just purchased a Canon Digital Rebel XT. She talked about upgrading to a DSLR and trying to master it on location. Then, Don Tillman steps up to the mic and discusses his Kodak point and shoot. Don had some excellent traveler tips. He's been on four cruises. Then I had a nice chat with Ben Long, who is a friend of mine and who spent the day with me in Puerto Vallarta. Ben is a photographer and writer who contributes to Macworld Magazine and has authored some great books. The photo on this page is me interviewing Ben on the ship (That's Ben on the right).

One of the tools we talked about in the show was an image editor called Graphic Converter by Lemkesoft. I wanted to make sure you got the correct link to this cool app. You can download and try it for free. If you like Graphic Converter, it costs $30.

Listen to the Podcast

Now that I've piqued your curiosity, it's time to listen to today's audio show titled, "Talking to the Shooters." You can download the podcast here (48 minutes).

Technorati Tags: , , ,

Program Mode

Don't get me wrong, I like program mode. I like my 24-85mm zoom lens too, but I don't want to use it for every shot I take. Sometimes I want a different look than what that lens can provide. The same goes for program mode.

In this week's podcast I discuss some of the situations where I prefer to use shutter priority, aperture priority, and manual exposure modes. Why? Because those modes give me a little more control in those situations so I can get exactly the shot I want. Here are a few examples.

Aperture Priority
This is a great mode for controlling depth of field. Aperture priority lets you set the f-stop, then the camera sets the corresponding shutter speed to make a good exposure. I like to use this mode for portraits with soft backgrounds (f-2, f-2.8) and for landscapes with extended depth of field (f-16, f-22).

Shutter Priority
When I need to freeze action, this is my choice. Shutter priority lets you set the shutter speed and the camera sets the correct aperture for you. I use shutter priority for outdoor sports (1/500, 1/1000, 1/2000) and to freeze moving water in its tracks (1/250, 1/500). If I want moving water to have a flowing, angel hair like appearance, then I slow the shutter speed way down (1 second, 2 seconds).

Manual Mode
This mode is the choice when I want complete control over both the shutter and aperture settings. My favorite use for manual mode is indoor flash photography at wedding receptions. I set the aperture to f-5.6 and the shutter speed to 1/30. This allows me to capture the ambient light in the surrounding environment so my subjects aren't illuminated against a black background.

Listen to the Podcast

Now that I've piqued your curiosity, it's time to listen to today's audio show titled, "Life Beyond Program Mode." You can download the podcast here (30 minutes).

Technorati Tags: , ,

"Scanning Tips" - Podcast 17

Canoscan 9950F

How do you best set up your scanner when archiving all of those prints and slides that you have in storage? It's really not too bad once you know the numbers you have to plug in, and the resulting digital files they produce. That's what this podcast is about.

The first thing I want to mention is how much flatbed scanners have improved since I last bought one (which was about 5 years ago). While working on an article for Macworld Magazine, I got to test a number of scanners and really took a liking to the Canon 9950F scanner. The 9950F is both Mac and PC compatible, provides both USB 2.0 and FireWire connectivity, and scans many different sizes of film as well as prints. I use its driver with Photoshop, and when in the "Advanced" mode, have complete control over the scanning process. The results have been beautiful.

As easy as the interface was to use, I still had to make decisions about what numbers to plug into the "Output Resolution" box. Here's where a lot of people get confused. Do you put 150, 300, 600, or 1200? And what are the ramifications of each of those settings?

The general rule of thumb is that if you want to make photo-quality prints the same size or smaller than your hardcopy source material, choose 300 dpi. (I actually prefer "ppi" pixels per inch, but used the older term "dpi" dots per inch because that's what the scanning software used.) So if your original photo is 4"x6", then if you scan at 300 dpi, you'll be able to make photo quality 4"x6"s. Actually, I think you can go up to 5"x7" at that setting, so that's what I list in Table 1.

As you increase "Output Resolution," let's say to 600 dpi, you can then make bigger prints from your source material. The tradeoff is that the file size gets much larger too. So the trick is to find the balance between having enough Output Resolution to make the prints you want and controlling the file sizes so you have enough storage to handle all of this digitized material. Take a look at the following tables to help you choose the settings best for you.

Print Scanning Guide

------------------

Film Scanning Guide

------------------

In the Macworld article that comes out in a month or two, I get into the whole process from scanning, to cataloging, to output. But for now, you can begin to digitize with confidence some of those great shots you have from the "old film days."

Listen to the Podcast

Now that I've piqued your curiosity, it's time to listen to today's audio show titled, "Scanning Tips" You can download the podcast here (33 minutes).

Technorati Tags: , , ,

iPhoto 6

iPhoto 6 is arguably the most exciting release of Apple's venerable digital shoebox. New features in the current version includes:

  • 250,000 photo library capacity.
  • Full screen editing.
  • Online publishing with iWeb.
  • Non-managed library option for images on your hard drive.
  • Direct connect to Adobe Camera Raw.
  • Photocasting.
  • Lots of output options.
  • Included in the iLife '06 suite for $79.

One of the most notable new features in iPhoto 6 is that you can point to images already organized in the file system on your hard drive. This is a big change from its "managed library system" that has been your only option in the past. I've posted more details about this in What Happens When You Edit an Image Stored Outside of iPhoto 6. I've also published a more extensive piece titled iPhoto 6 First Impressions where I cover some of my favorite features in iPhoto 6, including Full Screen Editing mode. Here's what I had to say:

"Just click once on any thumbnail, tap the Full Screen button, and watch your image fill up the screen against a black background. You have all of your editing tools hiding on the bottom and the thumbnails hiding on top. A simple mouse-over reveals them.

"CMD-click up to 8 images in thumbnail mode, then tap the Full Screen button and compare them all at once. You can magnify each image using the slider at the bottom of the screen, or by simply pressing the 1 key (100%), 2 key (200%), or the 0 key to return to "fit in screen" size. You can rate your photos using the floating info box (and add comments too). Everything works great in full screen mode. If you have really big Photoshop images, they may take a few seconds to reach full resolution. But for my cameras, including the Canon 5D, the performance was excellent."

In the podcast, I also discuss one of my favorite 3rd party plug-ins for iPhoto: iPhoto Library Manager. I think this handy app helps you keep your iPhoto libraries to a manageable size. If you'd like to read about more of my favorite iPhoto add ons, take a look at iPhoto 6 and 3rd Party Apps.

=====================

Listen to the Podcast

Now that I've piqued your curiosity, it's time to listen to today's audio show titled, "Is iPhoto 6 Right for You?" You can download the podcast here (31 minutes).

Technorati Tags: ,

"White Balance" - Podcast 15

White Balance Menu

The White Balance menu on your digital camera is one of your most powerful tools. Regardless if you have a compact or a DSLR, you can compensate for many difficult lighting situations by simply changing settings in this menu.

I often say that the white balance menu is like having an entire set of filters built right into your camera. The cool thing is, unlike glass filters, you don't have to buy, store, or clean white balance settings. You just have to find the settings.

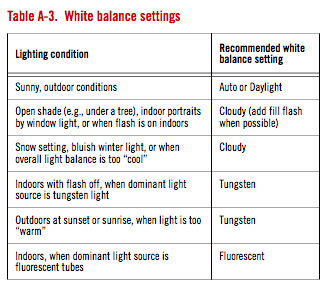
The easiest way to talk about color temperature, which is what white balance is all about, is in degrees Kelvin. This helps you correlate numbers to lighting situations and the controls on your camera. Most camera manuals will list the lighting situations in degrees Kelvin that their white balance menu items are designed to compensate for. To give you a taste of degrees Kelvin, here are some examples. (This information is from page 146 of the Digital Photography Pocket Guide, 3rd Ed).

Dawn, dusk, candle flame -- 1800-2200K
100W incandescent bulb -- 2800-3000K
Photographic daylight -- 5500K
Open shade outdoors, overcast sky -- 8000-9000K

At the lower end of the Kelvin scale, the light is recorded as warmish red, and at the higher end the camera sees coolish blue.

Our eyes naturally compensate for these varying conditions. But cameras have a more difficult time. That's why we have white balance compensation.

Take a look at the following comparison of a church interior. I captured these images with a Canon Digital Elph with the flash turned off. The image on the left was recorded with the auto white balance setting. For the picture on the right, I turned on the cloudy white balance setting. (Refer to the screen shot at the top of the page to see the actual setting.) Notice that the tones are cool in auto white balance, but warm up considerably in cloudy mode. Which one looks better? That's up to you. But the point is that you have more control over how your camera records color temperature by finding your white balance menu and learning its settings.

White Balance Comparison

=====================

Listen to the Podcast

Now that I have your curiosity piqued, it's time to listen to today's audio show titled, "White Balance." You can download the podcast here (29 minutes).

Technorati Tags: , , , ,