Recently in Photos for OS X

  Page 1 of 12 in Photos for OS X  

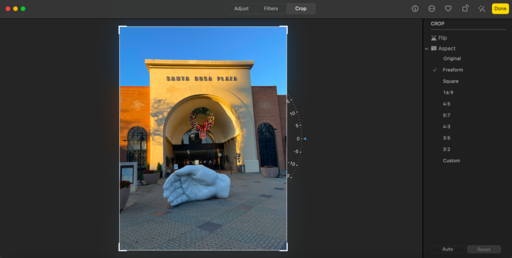
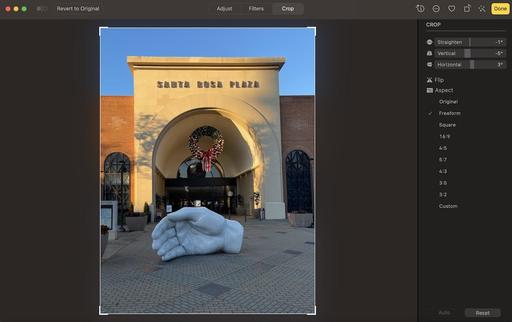
When Apple rolls out a new operating system, such as macOS Ventura, there are so many little improvements, that sometimes it takes a while to uncover all of the gems. The much-improved straighten tool in Photos is one of those. And it's terrific.

ventura-straighten-1400.jpg The improved Straighten tool in Photos for macOS Ventura.

Compared to what we had to work with in the Monterey edition of Photos, Ventura both improves the interface and adds vertical and horizontal adjustments. Plus the straighten command is so much easier to use. Just click on the Crop tab to reveal it.

Here's what we had in Monterey.

Monterey-Crop.png The Straighten tool in Photos for macOS Monterey.

First of all, the annoying "dial" is replaced by a more logical linear slider. Plus, we can correct buildings now with the vertical and horizontal sliders - a much needed tool.

iPhone photography just got a bit more versatile!

Learn More About the Power of Photos for macOS

If you use a Mac and haven't explored Photos for a while, I think you'll be surprised by its power. Take a look for yourself by visiting Photos for macOS Ventura and iPhone Essential Training.

You can share your thoughts at the TDS Facebook page, where I'll post this story for discussion.

With Photos for macOS, you can manage, enhance, and share photos in a variety of ways. It's evolved into a powerful, but easy to use imaging application. And it's free!

In this course, I take you on a detailed exploration of how to use Photos for both the Monterey and Ventura versions, plus tips for iOS as well.

The power of Photos in macOS Ventura and on your iPhone from Photos for macOS Ventura and iPhone Essential Training by Derrick Story

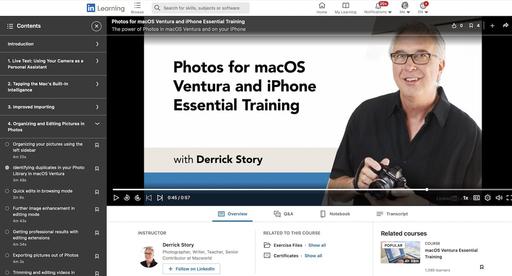
I start with an exploration of the interface, then move into the new features. Noteworthy topics include how to remove duplicates from your library, different ways to use Live Text to transform your camera into a personal assistant, how to search for pictures by object type, copy images from messages to Photos, use Quick Notes with Photos, and automate common tasks with shortcuts and built-in Mac intelligence.

Also included are updates on some of the recent improvements to the importing process, with lots of useful tips for organizing and editing your pictures. (The editing tools are terrific!) Upon completing this course, you'll be working more effectively with Photos for macOS Monterey, Ventura, and iOS.

photos-training-screenshot-1600.jpg

The lessons are divided into easy to digest short movies that average between 2-4 minutes. You can work along with the techniques by using the included example Photos library. The entire course runs just 1 hour 37 minutes.

If you use a Mac and haven't explored Photos for a while, I think you'll be surprised by its power. Take a look for yourself by visiting Photos for macOS Ventura and iPhone Essential Training.


You can share your thoughts at the TDS Facebook page, where I'll post this story for discussion.

Curious about Live Text? Want to know more about using your iPhone camera as a personal assistant? I explain all of this, and lots more, in my latest LinkedIn Learning title, Photos for macOS Monterey and iPhone Essential Training.

photos-monterey-linkedin-1024.jpg

With the free Photos for macOS software from Apple, you can manage, enhance, and share photos in a variety of ways. In this course, photographer, author, and educator Derrick Story takes you on a detailed exploration of Photos for macOS.

Derrick gives you a tour of the interface and the headline new features, then goes into detail on the ways you can use Live Text to transform your camera into your personal assistant. He shows you how to search for pictures by object type, copy images from messages to Photos, use Quick Notes with Photos, and automate common tasks with shortcuts.

Derrick walks you through the improved importing process and gives you some useful tips on organizing and editing your pictures directly in Photos. Plus, he shows you where to find more tips and techniques for working with Photos for macOS.

There are lots of other goodies in this training as well, such as importing one Photos library into another (new in Monterey), enhanced object recognition for search, and more.

If you enjoy iPhone photography and want to get the most out of your smartphone, then take a look at Photos for macOS Monterey and iPhone Essential Training. I think you will find it both entertaining and helpful.

You can share your thoughts at the TDS Facebook page, where I'll post this story for discussion.

I truly enjoy using the iPhone 12 Pro Max with the HEIC file format for my everyday pictures. The results are terrific, and the file sizes are compact.

But when I want to have a little extra fun with those images, I've been firing up ON1 Effects 2021 that works as both a standalone app and as an Editing Extension for Photos for macOS. Effects has a wide variety of adjustments that work great with HEIC files (Jpegs and RAWs as well), and the workflow couldn't be easier.

Effects is also an excellent plugin for Photoshop, Lightroom, and Capture One Pro. The steps are similar as these.

Basic Steps to Using Effects as a Photos Editing Extension

Here are the basic steps that I use to add a little punch to my everyday pictures.
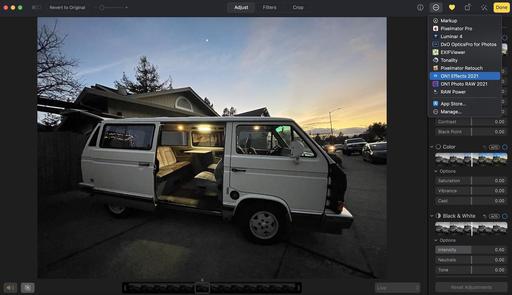
001-ON1-for-HEIC.jpg Step 1 - Go to Edit mode in Photos for macOS and choose ON1 Effects from the Extensions dropdown menu.
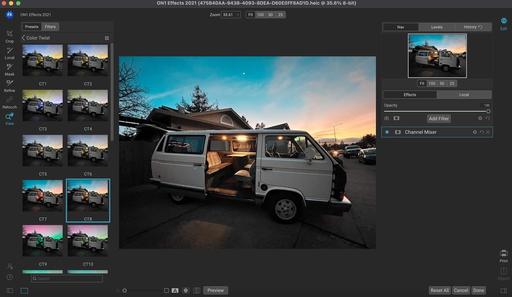
002-Apply-Filter.jpg Step 2 - Once you're in Effects, experiment with the Presets on the left side of the interface.
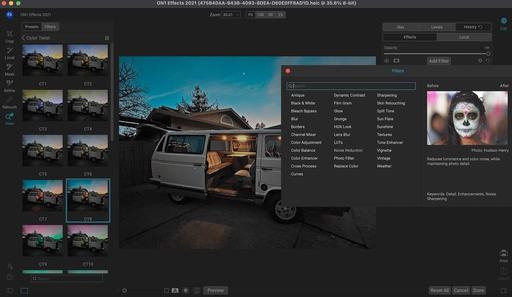
003-Add-Filters.jpg Step 3 - Further enhance your image by tapping a variety of adjustments. ON1 calls them Filters.
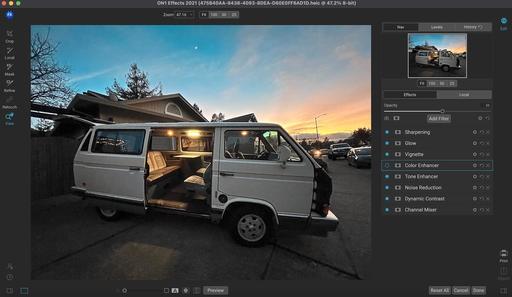
004-Enhanced.jpg Step 4 - Collapse the pallet on the left side to get a better look at your image before sending back to Photos. Click the Done button when satisfied with your work.
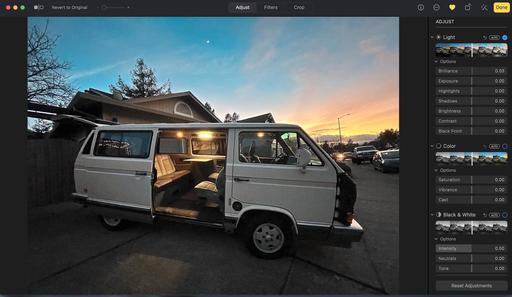
006-Back-to-Photos.jpg Step 5 - Back in Photos. Exit the editing interface by clicking on the yellow Done button.

More You Can Do with Effects

There are many different ways to approach ON1 Effects. It works as a standalone app. You can use it as an editing extension for Photos, as shown here. And it's a very nice plugin for Photoshop, Lightroom, and Capture One Pro 21.

I usually start with browsing presets to get a feel for where I might want to go with an image. For my infrared photography, I create my own presets as starting points. These include the red/blue channel swaps and other adjustments that I commonly use.

Beyond that, local adjustments are available, as are gradient masks and more. There's really no limit to what you can do with your pictures in this app.

Creating a Totally Non-Destructive Workflow with Effects and Photos

When you send an image from Apple Photos to Effects, any settings you apply will be saved with the image, so that you can send the image back to Effects with your edits intact, as long as you do not subsequently edit that image inside Photos.

To re-edit an image processed inside Effects, click on the image in Photos and follow the same steps above. When your image is opened inside Effects, you will see all of the changes you made in your previous session.

Keep in mind however, once you make any editing changes to your image inside Photos, your Effects edits will be "baked in" to the image. You can send the image again to Effects, but your original settings won't be visible.

If you wish to keep your original Effects edits, duplicate the image inside Photos (Image > Duplicate), which will create a new virtual copy of the file. You can then edit one of the versions in Photos, using the other one to preserve your Effects edits.

Downloading a Free Trial or Purchasing ON1 Effects 2021

You can try ON1 Effects 2021 free for 14 days. If you decide to purchase, you can buy for $69.95. Save 15% off that price by using coupon code: THEDIGITALSTORY.

Bottom Line

I started using ON1 Effects for my infrared photography because of its excellent Channel Mixer, LUTs, and presets. But I've discovered that it's useful for all of my photography. It's a robust tool for both my Photos and Capture One Pro workflows. And it's a great way to get the most out of my iPhone shots as well.

Product Links and Comments

There are product links in this article that contain affiliate tags. The Digital Story may receive compensation if you purchase a product via one of those links. There is no additional cost to you.

You can share your thoughts at the TDS Facebook page, where I'll post this story for discussion.
There are many features in Photos for Mac and iOS that I like, but until now, Filters was not one of them. My complaint was that there weren't many to choose from, and they often didn't look that great when applied full force. That's changed.

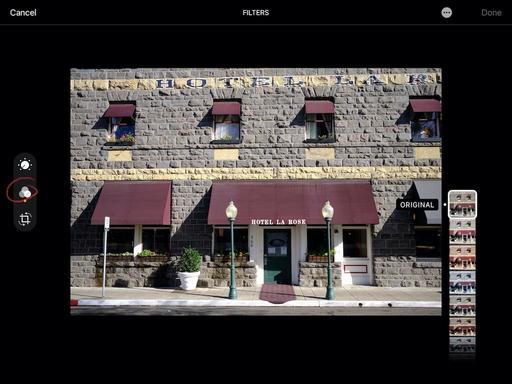
IMG_0192.jpeg Tapping Filters in Photos for iOS

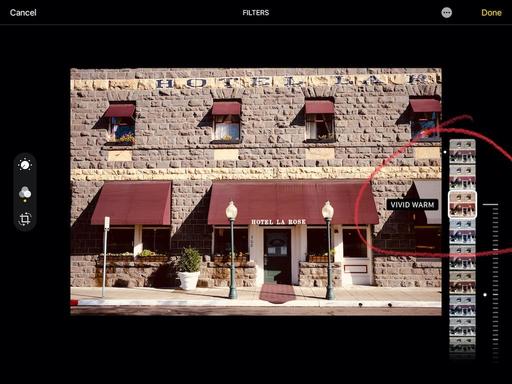
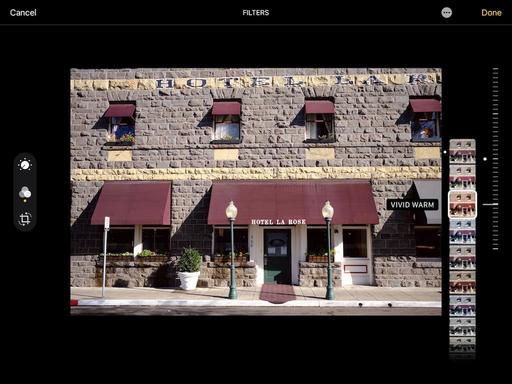
The Filters in Photos for both iOS and macOS Big Sur are now adjustable. And that's a whole new ballgame. For example, I applied Vivid Warm to this historic building in Santa Rosa, CA. At full force, the filter was just too strong and was not the effect that I was looking for.

IMG_0193.jpeg

In the past, this was the "take it or leave it" choice I faced. So I often left it. But now, once I tap on a specific filter, a slider appears next to it that allows me to adjust the intensity of the effect.

IMG_0194.jpeg Adjusting the intensity of the applied filter.

For this image, 25 percent was the look I wanted. And that is a completely different result than 100 percent.

Adjustable Filters is just one of the refinements in Photos for macOS Big Sur and iOS. At last, I can actually use this feature of the software... and like it!

How to Watch Photos for macOS Catalina and iPadOS

Learn more about Photos for the Mac and iPad by checking out my course on LinkedIn Learning and on lynda.com. This course is perfect for Mac and iPad based photographers who shoot with iPhone, Mirrorless, and DSLR cameras. It covers both photography and movies. And if I say so myself, it's a lot of fun.

I'm currently working on an updated title that covers the latest iPhones, Big Sur, and more. Stay tuned for its release date.

You can share your thoughts at the TDS Facebook page, where I'll post this story for discussion.

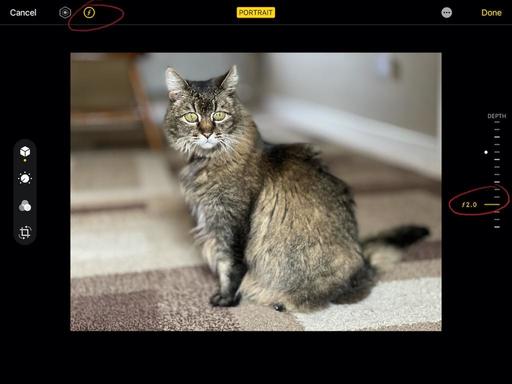
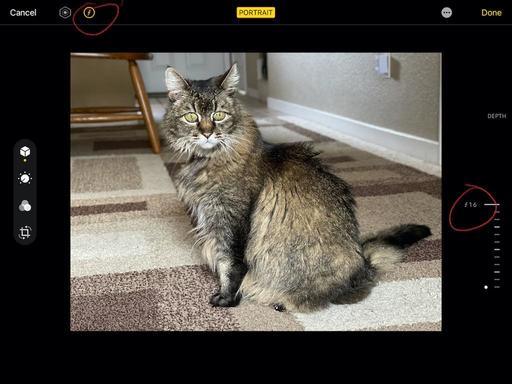
One of my favorite discoveries with the iPhone 12 Pro is the ability to change the depth of field while editing in Photos for iOS for my Portrait captures. It's truly amazing and very easy.

IMG_0179.jpeg Depth of field adjusted to f/2.0 in Photos for iOS after the shot was captured in Portrait mode on an iPhone 12 Pro Max.

IMG_0180.jpeg Depth of field changed to f/16 in Photos for iOS after the shot was captured in Portrait mode on an iPhone 12 Pro Max.

The steps are easy. First, capture your picture in Portrait mode with the iPhone. View the image in Photos for iOS on the iPhone or iPad. Go to Edit mode and tap on the "f" in the upper left corner. When it highlights, a Depth Scale should appear on the right side of the interface. Choose the depth you want for the picture. The background will change before your very eyes.

Now you have complete control over the softness of the background.

You can share your thoughts at the TDS Facebook page, where I'll post this story for discussion.

RAW Photography with Older iPhones

Only the latest iPhones (and top of the line models at that) can take advantage of Apple's new ProRAW format. But earlier models capture RAW quite well, and by following a few simple steps, can yield beautiful results.

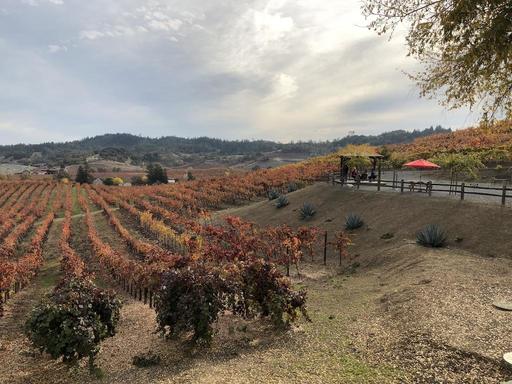
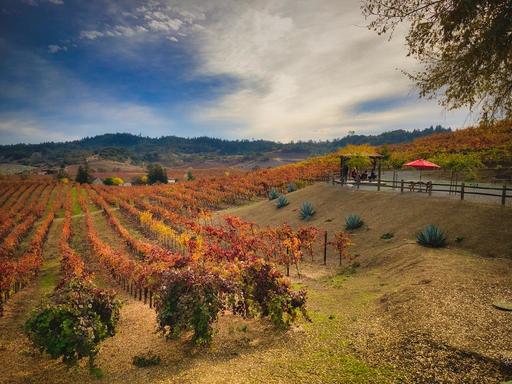
I photographed this fall vineyard scene shooting RAW+Jpeg with an iPhone X using the Halide app. Thanks to the smarts of the iPhone, the Jpeg version looks good despite the strong backlighting from the sky.

unmodified-jpeg-Photos.jpeg Unmodified JPEG captured with an iPhone X using Halide.

But I wanted to get a bit more out of this image, so I decided to spend a couple minutes working with the RAW file. Here is the workflow that I use and recommend. I use Luminar 4 as an Editing Extension for Photos for macOS. Earlier versions of Luminar work well, as do other editing extensions.

  • Open the image in Photos for macOS on a Mac.
  • Go to Edit mode.
  • Go to Image > Use RAW as Original (this switches you to the RAW file from the JPEG).
  • Click on the 3 dots in the top toolbar and choose Luminar (or your favorite Editing Extension).
  • Enhance the RAW file to your taste in Luminar and click Save Changes.
  • Add any finishing touches back in Photos for macOS.

finished-vineyard.jpeg RAW version of vineyard edited in Luminar 4 and Photos for macOS. Images by Derrick Story.

The aspect of the image that I really appreciate being able to adjust in RAW is the sky. I can prevent blown-out highlights with the clouds and bring back some blue in the midtowns.That's far more difficult, if not impossible, with a JPEG version.

If you use iCloud with Photos, then the finished RAW file will be available on all of your Apple devices, including the iPhone that originally captured it. It's a good workflow for those times that you don't have one of your other cameras with you.

How to Watch Photos for macOS Catalina and iPadOS

Learn everything you need to know about Photos for the Mac and iPad by checking out my latest course on LinkedIn Learning and on lynda.com. This course is perfect for Mac and iPad based photographers who shoot with iPhone, Mirrorless, and DSLR cameras. It covers both photography and movies. And if I say so myself, it's a lot of fun.

You can share your thoughts at the TDS Facebook page, where I'll post this story for discussion.

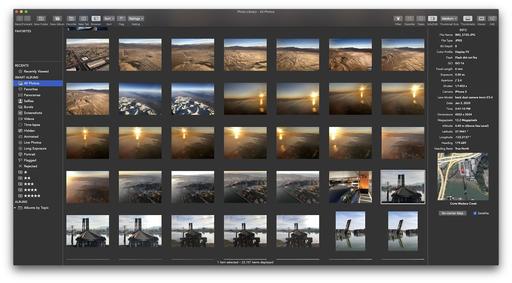
Gentlemen Coders has released RAW Power 3.0 for macOS and iOS. It's a comprehensive update with much to unpack over the coming weeks, but the focus today is how it brings Star Ratings to Photos for both the Mac and iOS versions of the app.

star-ratings-photos.jpg Photos displaying the rating albums created by RAW Power.

The rating system is easy to use, and is ingenious in its design. If you're running macOS Catalina, the RAW Power app allows you to use your Photos library in real time. This even works if you have the Photos app open. Within RAW Power you can tap all the powerful tools to enhance your images and have those improvements saved directly to your iCloud Photos library. But now, you can also rate and tag those pictures, and they too will be saved to iCloud and acknowledged in the Photos apps.

RAW-Power-3-Photos.jpg RAW Power 3 tapping my Photos library.

RAW Power creates Star Rating Albums that are displayed both in RAW Power, and in the Photos app. RAW Power uses Aperture style keyboard shortcuts for the ratings allowing you to move quickly through the images. What's really cool, even if you're running Photos on macOS Mojave, which doesn't allow the library sharing as in Catalina, the Star Rating Albums still appear in the app if they were added in RAW Power running on a Catalina machine using the same Photos library. The overall approach is both clever and works great.

This update, over a year in the making, includes tons of other stuff as well. Here's a brief overview.

RAW Power 3.0 for Mac and iOS creates the first real option for serious photographers in the Apple ecosystem. RAW Power 3.0 is now the first and only third-party app to include full support for Apple Photos libraries on Mac and iOS, allowing photographers to rate and edit their images anywhere and any time. New features introduced today include flexible storage options, synchronized ratings and flagging for Photo libraries, support for Files.app on iOS, advanced auto enhance, LUT support and one-tap integration with the popular Halide camera app on iOS. RAW Power 3.0, developed by Nik Bhatt, a former Apple engineer who led the iPhoto and Aperture teams, is available for download today on the Mac and iOS App Stores.

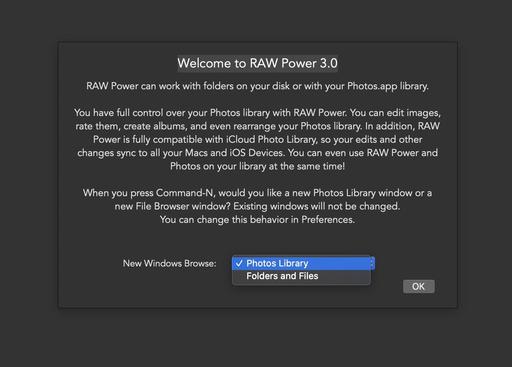
Choose-Photos.jpg macOS Catalina photographers can choose the Photos Library from within RAW Power 3. Or they can use the file browser.

The new RAW Power app for iOS introduces the much-requested ability to manage photos either in Photos or in Files.app. Now, photographers can easily work on their collections of images in either or both environments and switch seamlessly between them. Users can import images from an SD card into RAW Power using the Files app. Additionally, the new Copy to RAW Power Share Extension makes it easy to import images from other apps into the Files storage for RAW Power.

I'll be covering more of the features in upcoming posts. But after my initial testing on both macOS and iOS, I can comfortably say that this elevates the Photos/iCloud environment to a high level for serious photographers.

RAW Power 3.0 runs on macOS Catalina and Mojave and is available for $39.99 or as a free upgrade for existing users of RAW Power for Mac 2.0. (It does not support the iCloud Library sharing on Mojave, however.) RAW Power for iOS 3.0 is available for $9.99 or as a free upgrade for current RAW Power for iOS customers. RAW Power for iOS 3.0 runs on iOS 12 and 13, but does not support iPhone 5s, 6 or 6 Plus, or iPad mini 3 or earlier.

You can share your thoughts at the TDS Facebook page, where I'll post this story for discussion.

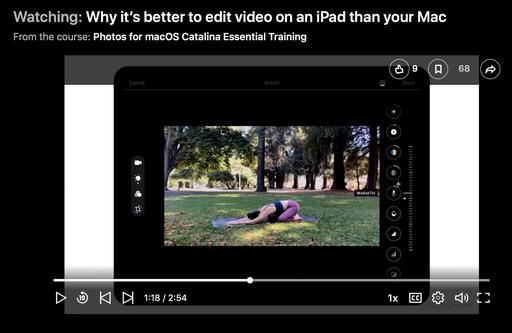
iPadOS has changed a lot of things for photographers who use Apple tools. Now we have a robust Photos app on the iPad, including tools for editing videos that we don't have on the Mac. I'm serious. Take a look at this short movie to see what I'm talking about.

Why it's better to edit video on an iPad than your Mac from Photos for macOS Catalina Essential Training by Derrick Story

Sure we have lots of video editing options for both platforms. But in this case, that's not the point. If you're an iPhone-toting photographer connected to iCloud, then when you record video with your smartphone, it's right there in the ecosystem waiting for you.

You don't have to transfer it to another app or platform; just open Photos for iPadOS, click on your movie, then adjust exposure, white balance, crop, straighten, and even apply filters. The adjustments are non-destructive and the completed work is available on all your devices via iCloud. It's really slick.

How to Watch Photos for macOS Catalina and iPadOS

This is just one of the many cool topics that I cover in my latest course on LinkedIn Learning and on lynda.com. Photos for macOS Catalina and iPadOS is perfect for Mac and iPad based photographers who shoot with iPhone, Mirrorless, and DSLR cameras. It covers both photography and movies. And if I say so myself, it's a lot of fun.

videos-iPadOS.jpg

You can share your thoughts at the TDS Facebook page, where I'll post this story for discussion.

With Photos for macOS, you can easily manage, enhance, and share a large library of images. And thanks to macOS Catalina and iPadOS, the latest version offers a new level of compatibility across devices, aligning the user experience as well the editing and AI-powered organization tools.

photos-catalina-intro.jpg

In this course, Derrick Story takes you on a detailed exploration of this powerful app. Learn how to manage thousands of pictures quickly and easily, and edit and enhance the color, contrast, and compositions of images and video with the built-in editing tools. Derrick also explains how to export images, create slideshows, and prepare photos for printing. Along the way, he highlights the new features that make Photos for macOS Catalina such an important upgrade.

Here are some of the topics covered:

  • What's new in Photos for macOS and iPadOS
  • Creating new Photos libraries
  • The latest Editing Extensions for Photos
  • Importing images
  • Enabling iCloud syncing
  • Backing up a Photos library
  • Organizing images
  • Deleting, removing, and hiding images
  • Editing videos
  • Editing images
  • Working with pictures
  • Exporting images
  • Creating slideshows
  • Printing at home

The thing that I really like about this course, is that I show you the best of both worlds. Some techniques are better on the Mac, while other things, such as editing your videos, are actually better suited for the iPad version of Photos.

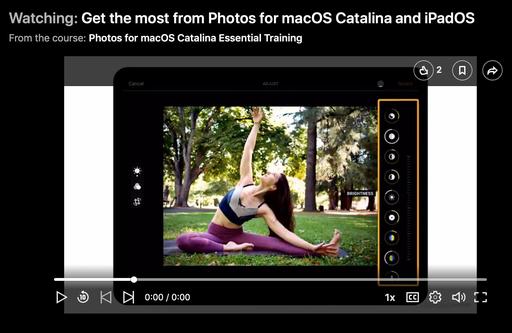
And regardless of which way you go, all of your work is automatically backed up to iCloud and shared across all devices. It's really a wonderful workflow. Check out the course intro video.

Get the most from Photos for macOS Catalina and iPadOS from Photos for macOS Catalina Essential Training by Derrick Story

If you haven't looked at photos for a while, then I think it's time to revisit. And if you are a Photos user, then I think you're really going to like this update.

How to Watch Photos for macOS Catalina and iPadOS

Learn everything you need to know about Photos for the Mac and iPad by checking out my latest course on LinkedIn Learning and on lynda.com. This course is perfect for Mac and iPad based photographers who shoot with iPhone, Mirrorless, and DSLR cameras. It covers both photography and movies. And if I say so myself, it's a lot of fun.

You can share your thoughts at the TDS Facebook page, where I'll post this story for discussion.